Setting up an embroidery machine to create school patches requires careful attention to detail. From selecting the right needle and thread to positioning the fabric with the appropriate stabilizer, each step plays a vital role in producing high-quality results. While the process may seem straightforward, overlooking any of these essential elements can lead to frustrating complications down the line. By understanding the key operator steps involved, embroiderers can guarantee a smooth and efficient embroidery run, delivering school patches that meet the desired standards.
Preparing the Embroidery Machine
Before commencing the embroidery process, the machine must be properly set up. The operator should verify the needle size, thread, and bobbin are appropriate for the task. The hoop must be secured firmly, and the design properly aligned. Stabilizer material should be placed beneath the fabric to provide support. The machine’s tension, speed, and other settings should be adjusted according to the fabric type and stitch requirements. By meticulously preparing the embroidery machine, the operator can minimize potential issues and produce high-quality school patches efficiently.
Threading the Embroidery Machine
Threading the embroidery machine properly is essential for successful embroidery. The needle and thread must be prepared, and the tension should be adjusted correctly. Ensuring these steps are followed will set the stage for a smooth and efficient embroidery process.
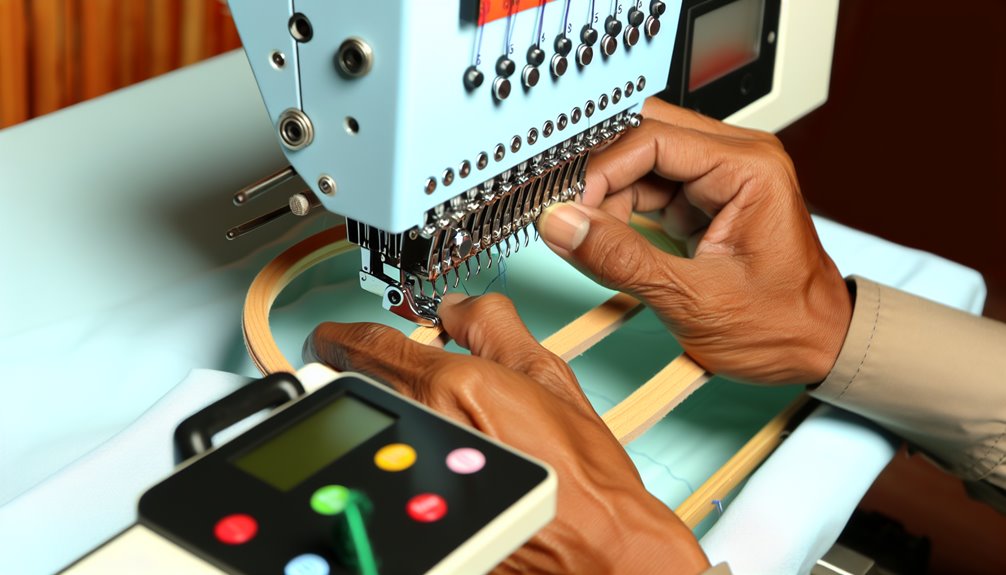
Prepare Needle and Thread
With the embroidery machine primed and ready, the next crucial step is to properly prepare the needle and thread. The operator must select the appropriate needle size and type for the fabric and thread being used. Carefully insert the needle into the machine, ensuring it is securely in place. Next, the thread must be threaded through the various guides and tension discs, following the machine’s threading diagram. The thread should glide smoothly without any snags or tension issues. Properly preparing the needle and thread is essential for achieving consistent, high-quality embroidery results on the school patches.
Adjust Tension Properly
Proper thread tension is paramount for achieving the desired embroidery results on the school patches. The top thread should have just enough slack to form a small arc between the needle and the fabric. Conversely, the bobbin thread should have minimal slack, creating a near-straight line. Adjusting the tension knobs on the machine allows the operator to control this balance. Overtightening can cause the thread to break, while undertightening results in poor stitch quality. The operator must find the sweet spot through trial and error, checking the tension on both the top and bottom sides of the fabric.
Adjusting the Thread Tension
Proper thread tension is vital for achieving high-quality embroidery results. The thread tension must be adjusted to guarantee the top and bobbin threads interlock properly in the fabric’s center. If the tension is too tight, the fabric may pucker; if it’s too loose, the stitches will appear uneven and sloppy. Adjust the tension by turning the tension dial in small increments, testing the results, and making further adjustments as needed. Use the same thread weight and type in the needle and bobbin for the most consistent tension. Maintaining proper tension throughout the embroidery process is essential for producing crisp, professional-looking school patches.
Loading the Design File
To begin the process of loading the design file, the embroidery machine operator must first locate the design file. Once the file is found, the operator will need to transfer the design file to the embroidery machine’s software or memory.
Locate Design File
With the embroidery machine ready, the next step is to locate the design file. The operator must navigate to the computer’s file directory where the design files are stored. Once the correct folder is found, the operator can select the appropriate file for the school patch. Ensuring the file is in a compatible format, such as .dst or .pes, is vital. After locating the file, the operator can load it into the machine’s software, preparing the design for stitching. This step is essential, as the machine cannot begin the embroidery process without the necessary design data.
Transfer Design File
After locating the appropriate design file, the operator must transfer it to the embroidery machine’s software. This process guarantees the desired pattern is loaded and ready for stitching. The key steps are as follows:
| Step | Action |
|---|---|
| 1 | Connect the embroidery machine to the computer |
| 2 | Open the machine’s design software |
| 3 | Navigate to the file location |
| 4 | Select the appropriate design file |
| 5 | Click “Import” or “Load” to transfer the file |
With the design file successfully transferred, the operator can proceed to the next stage of the embroidery process.
Positioning the Design
Proper positioning of the design on the garment or fabric is an essential step in the embroidery process. The operator must guarantee the design is centered and aligned correctly before starting the machine. This can be done by marking the desired placement on the fabric or using the machine’s built-in positioning tools. Careful attention to detail at this stage will prevent costly mistakes and guarantee the final product meets the customer’s expectations. Once the design is properly positioned, the operator can proceed to secure the fabric in the embroidery hoop and begin the stitching process.
Securing the Patch Material
To properly secure the patch material, it is important to first stabilize the fabric. Next, the material should be tightly hooped to prevent distortion during the embroidery process. Finally, the fabric tension must be adjusted to guarantee a consistent stitch quality.
Stabilize Patch Material
Securing the patch material is a crucial step in the embroidery process. To guarantee a professional-looking final product, the patch must be stabilized before stitching. This is typically done by using an adhesive-backed stabilizer or a water-soluble topping.
| Stabilizer Type | Advantages | Disadvantages |
|---|---|---|
| Adhesive-backed | Provides strong support | Can leave residue on fabric |
| Water-soluble | Dissolves after stitching | May require additional fixation |
| Tear-away | Easily removable after stitching | Less support during stitching |
| Cut-away | Remains in the final product | May affect fabric flexibility |
| Fusible | Bonded to the fabric | Can stiffen the material |
The choice of stabilizer depends on the fabric type and desired outcome. Proper stabilization helps prevent distortion, puckering, and other issues during the embroidery process.
Hoop the Fabric Tightly
Hooping the fabric tightly is the next step in the embroidery process. The fabric must be secured within the embroidery hoop to prevent shifting during the stitching process. Aligning the patch material evenly within the hoop is vital. Confirm the fabric is taut and free of wrinkles or puckers. Adjust the tension of the outer hoop to hold the material firmly in place. Double-check the positioning to assure the design will stitch within the designated area. Proper hooping technique is essential to produce a clean, professional-looking school patch.
Adjust Fabric Tension
Adjusting the fabric tension is a critical step in properly securing the patch material within the embroidery hoop. The tension should be tight enough to prevent puckering or distortion, but not so tight that it causes the fabric to stretch. A well-adjusted tension guarantees the embroidery design is accurately reproduced on the patch.
| Fabric Tension Adjustment | Action |
|---|---|
| Too Loose | Increase tension |
| Best | Maintain current tension |
| Too Tight | Decrease tension |
Carefully monitor the fabric tension throughout the embroidery process, making adjustments as needed to maintain the ideal tension for the project.
Selecting the Appropriate Stabilizer
Selecting the appropriate stabilizer is a critical step in ensuring the success of embroidering school patches on a variety of fabrics. The stabilizer provides a sturdy backing that prevents puckering, distortion, and fabric shifting during the embroidery process. For lightweight fabrics like cotton, a water-soluble stabilizer works best, as it dissolves easily after the stitching is complete. For heavier materials such as denim or twill, a tear-away or cut-away stabilizer is more suitable, offering a stronger foundation. Choosing the right stabilizer based on the fabric type is essential for achieving professional-looking, long-lasting school patches.
Checking the Needle and Presser Foot
Proper needle and presser foot selection is essential for successful embroidery of school patches. The needle must be the appropriate size and type for the thread and fabric being used. Additionally, the presser foot should be designed for embroidery to guarantee consistent stitch quality.
To check the needle and presser foot:
- Inspect the needle for any bends, dullness, or damage. Replace the needle if necessary.
- Verify the presser foot is the correct embroidery foot and is properly secured in place.
- Adjust the presser foot height if needed to allow for smooth fabric movement under the needle.
Initiating the Stitching Process
With the needle and presser foot checked, the embroidery machine is now ready to initiate the stitching process. The operator selects the appropriate school patch design from the machine’s library and loads the fabric into the hoop. After securing the hoop, they start the stitching sequence. The machine precisely follows the programmed pattern, gradually building the intricate design stitch by stitch. As the stitching progresses, the operator monitors the process, ensuring the fabric remains taut and the thread tension is ideal. With each completed school patch, the operator removes the hoop and trims any excess threads, preparing the piece for final inspection.
Monitoring the Embroidery Run
As the embroidery machine diligently executes the programmed pattern, the operator’s vigilance is paramount. Closely monitoring the stitching process guarantees a successful outcome. Key responsibilities include:
- Observing the machine’s performance, checking for any thread breaks, needle issues, or fabric misalignment.
- Promptly addressing any problems that arise, such as quickly rethreading the machine or realigning the fabric.
- Documenting the run, recording critical details like stitch count, thread tension, and any necessary adjustments made during the process.
Attentive monitoring and timely interventions are crucial to producing high-quality school patches consistently.